.svg)


Tile Quality Tests Every Homeowner Should Know
ByNandana Priya
Thu , Jul 02 , 2026
Read Time: 5 Min
Testing tiles is not just for engineers. A few basic checks, some before you buy, some prior to the installation, and then after the job is done, are all that is needed. These tile tests can save you money, time, and effort in the long run.
Imagine a floor that sounds hollow underfoot, tiles that scratch within months, or a bathroom that becomes a slip hazard. These are real problems, but the right tile tests can prevent them from ever happening. You do not need special equipment for most of these. Just knowing what to look for is enough.
Note: Some tile tests, such as water absorption, PEI rating, slip resistance, and Mohs hardness, are technical tests usually mentioned in product specifications. Homeowners can do quick visual or sample checks at home, but these should not replace manufacturer test data or expert installation inspections.
Read the blog to learn more about tile checks.
Water Absorption Test
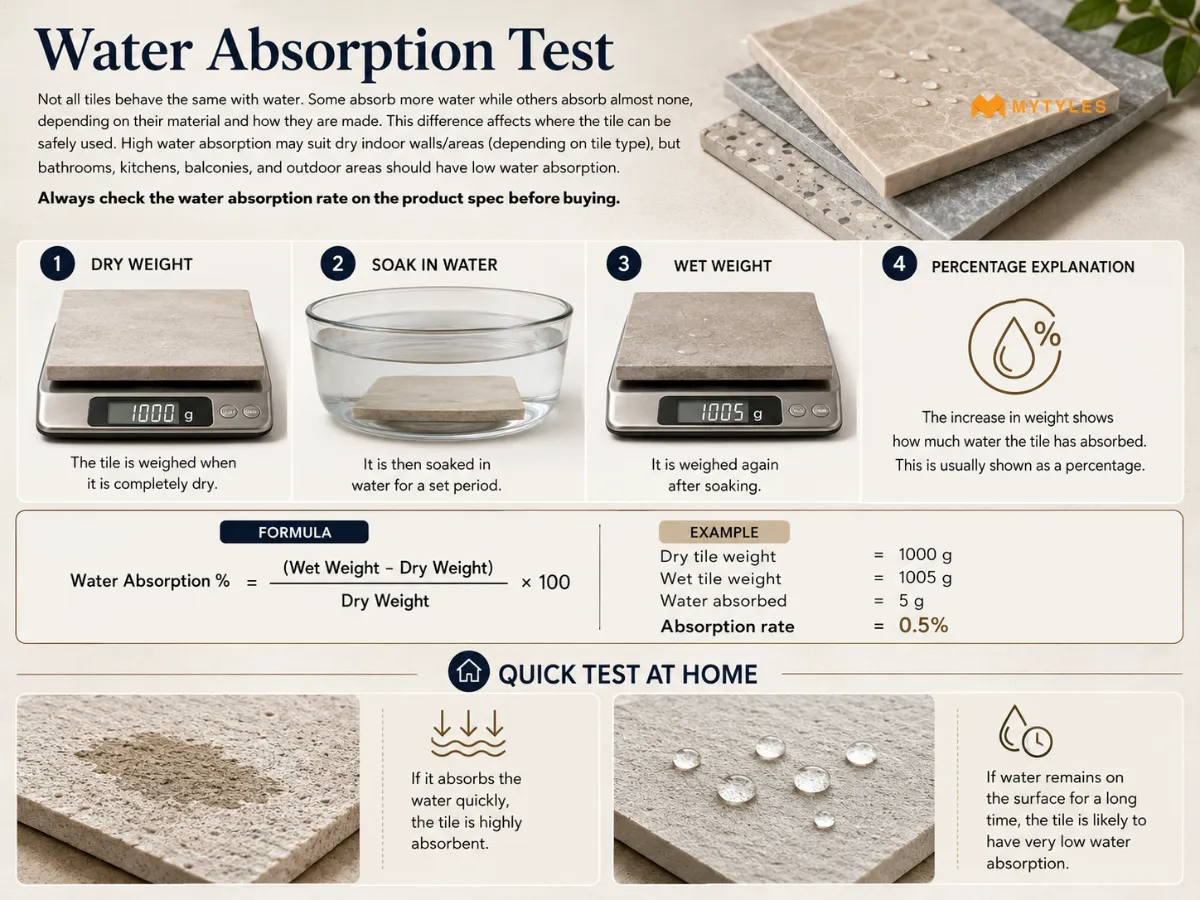
Some tiles absorb more water, and a few absorb almost none. They depend on the material and manufacturing processes of the tile.
The difference determines where the tile can safely go. Tiles with high water absorption may be suitable in dry indoor areas and walls, depending on the tile type. But for bathrooms, kitchens, balconies, or any outdoor area, water absorption should be low. Always check the water absorption rate on the product spec before buying.
In the tile water absorption test:
- The tile is weighed when it is completely dry
- It is then soaked in water for a set period and weighed again
- The increase in weight shows how much water the tile has absorbed
- This is usually shown as a percentage
Here is a simple way to understand it. A dry tile weighs 1000 g. After soaking it weighs 1005 g. It has absorbed 5 g, so the absorption rate is 0.5 % .
Quick Test: At home, just drop some water on the back of the tile. If it absorbs the water quickly, the tile is highly absorbent. If water remains on the surface for a long time, the tile is likely to have very low water absorption.
Scratch And Hardness Test
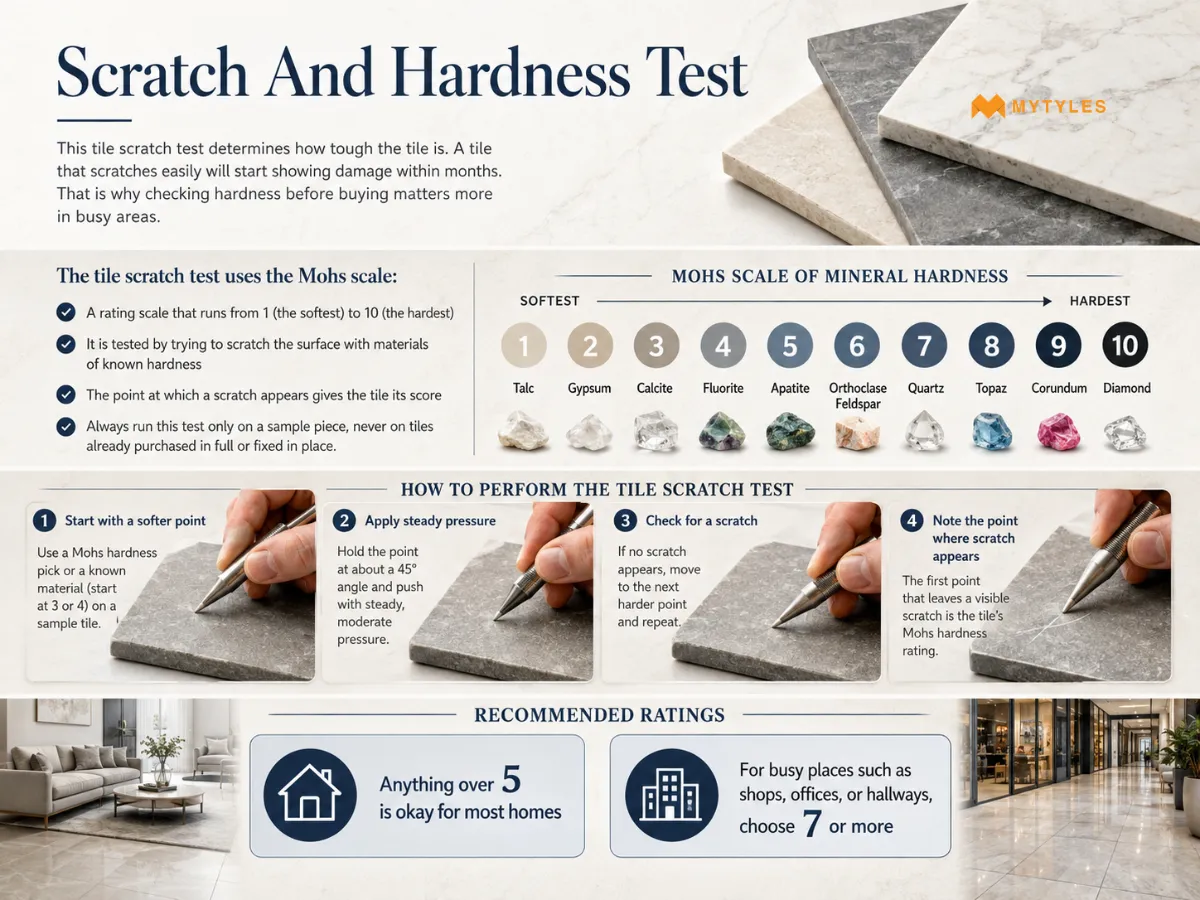
This tile scratch test determines how tough the tile is. A tile that scratches easily will start showing damage within months. That is why checking hardness before buying matters more in busy areas.
The tile scratch test uses the Mohs scale:
- A rating scale that runs from 1 (the softest) to 10 (the hardest)
- It is tested by trying to scratch the surface with materials of known hardness
- The point at which a scratch appears gives the tile its score
Always run this test only on a sample piece, never on tiles already purchased in full or fixed in place.
Recommended ratings:
- Anything over 5 is okay for most homes
- For busy places such as shops, offices, or hallways, choose 7 or more
PEI Rating (Abrasion Test)
.webp)
Abrasion happens slowly, day by day, with every footstep. The PEI rating measures how well a glazed tile's surface holds its finish under constant foot traffic.
A machine presses abrasive materials repeatedly over the glazed surface in cycles. Each round is inspected by experts for scratches or dullness. The total number of cycles the tile survives before showing wear determines its final PEI rating. The class ranges from 0 to 5.
Note: PEI rating applies to glazed tile surfaces only. It measures surface wear and finish durability, not slip resistance, breaking strength, or load-bearing capacity. Always check these separately in the product specification.
PEI Rating | Wear Resistance Level | Suitable Areas |
|---|---|---|
| PEI 0 | No foot traffic | Wall tiles only; not suitable for floors |
| PEI 1 | Very light foot traffic | Bedrooms, and areas with soft footwear or bare feet |
| PEI 2 | Light foot traffic | Bedrooms, bathrooms, and low-use residential floors |
| PEI 3 | Moderate foot traffic | Living rooms, kitchens, hallways, and regular residential floors |
| PEI 4 | Heavy foot traffic | Busy homes, offices, shops, restaurants, and light commercial spaces |
| PEI 5 | Very heavy foot traffic | Malls, airports, hotels, schools, and high-traffic commercial areas |
R-rating (Slip Resistance Test)
.webp)
The tile slip-resistance test is one of the important tests to consider, as it deals with safety. Wet floors are where most home accidents happen. The R-rating gives an indication of slip resistance under controlled ramp-test conditions. This makes it one of the more practical numbers to check before buying.
In this test, the tile is placed on a ramp that slowly becomes steeper. The surface is coated with oil to make conditions as slippery as possible. A person walks across it, and the angle at which they first lose grip becomes the tile's R-rating.
A higher R-rating means the tile gives better grip. R9 works for most dry indoor areas. Bathrooms, kitchen floors, pool edges, and balconies need at least R10 or R11. For outdoor spaces, commercial kitchens, or any area that stays consistently wet, R12 or R13 is the safer choice.
R-rating | Slip Resistance Level | Suitable Areas |
|---|---|---|
| R9 | Basic grip | Dry indoor areas such as bedrooms, living rooms |
| R10 | Moderate grip | Kitchens, dining areas, hallways, and indoor floors with light moisture |
| R11 | Good grip | Bathrooms, balconies, entryways, outdoor covered areas, and slightly wet spaces |
| R12 | Strong grip | Outdoor areas, ramps, commercial kitchens, parking areas, and wet zones |
| R13 | Very strong grip | Industrial areas, heavy wet zones, steep ramps, and spaces exposed to oil, grease, or heavy moisture |
Flatness And Warpage Test
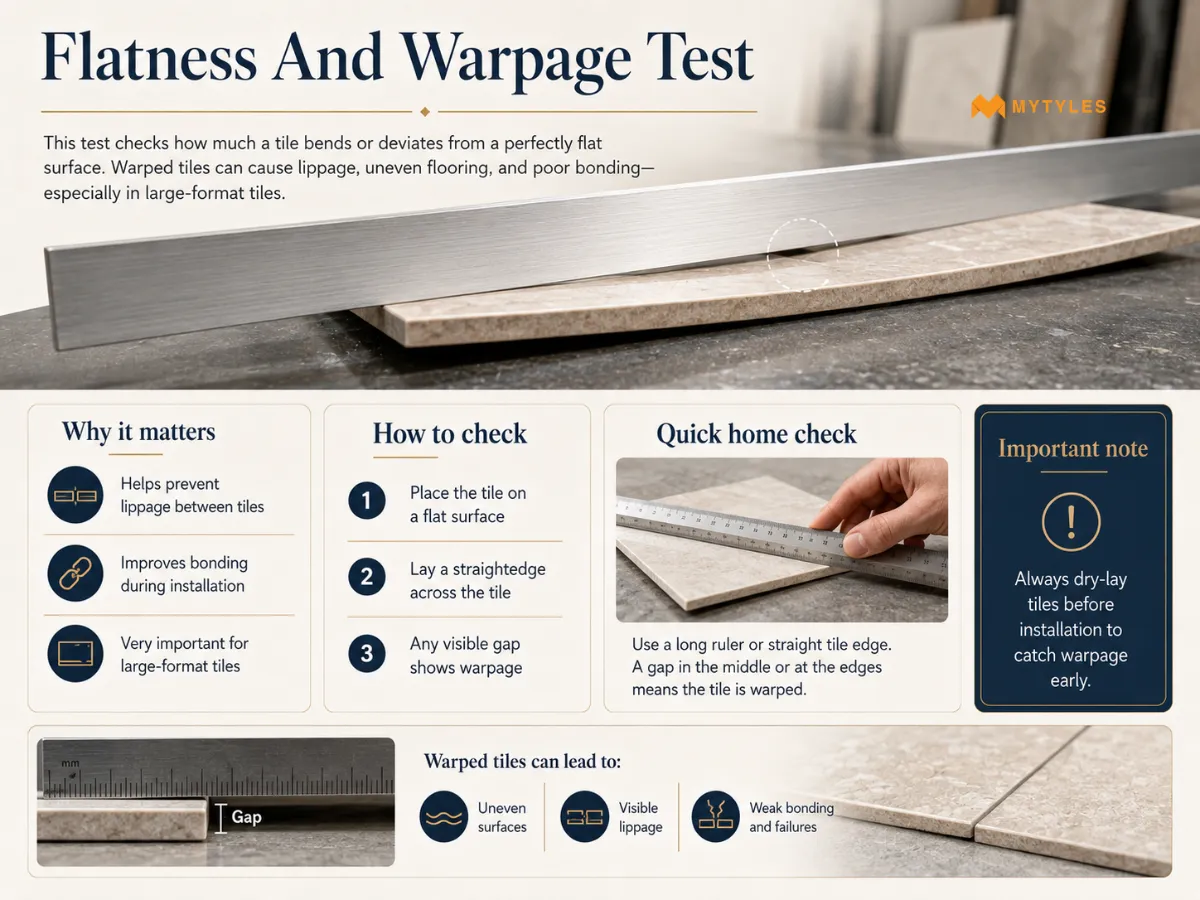
The tiles are exposed to intense heat as part of the manufacturing process. This does not always leave them perfectly flat and can cause slight bending, which is called 'warpage'. The tile flatness test checks how far a tile deviates from a perfectly flat surface.
Warped tiles create uneven tile flooring and raise the risk of lippage, the visible step between two tiles. They also bond poorly with the surface below. The tile warpage check is non-negotiable before laying, especially for large-format tiles. Always dry-lay tiles before installation to catch this early.
Quick Home Check: Place a long ruler or straight tile edge across the surface. Any visible gap in the middle or at the edges means the tile is warped. Even a small bend can cause problems after laying.
Shade And Batch Check
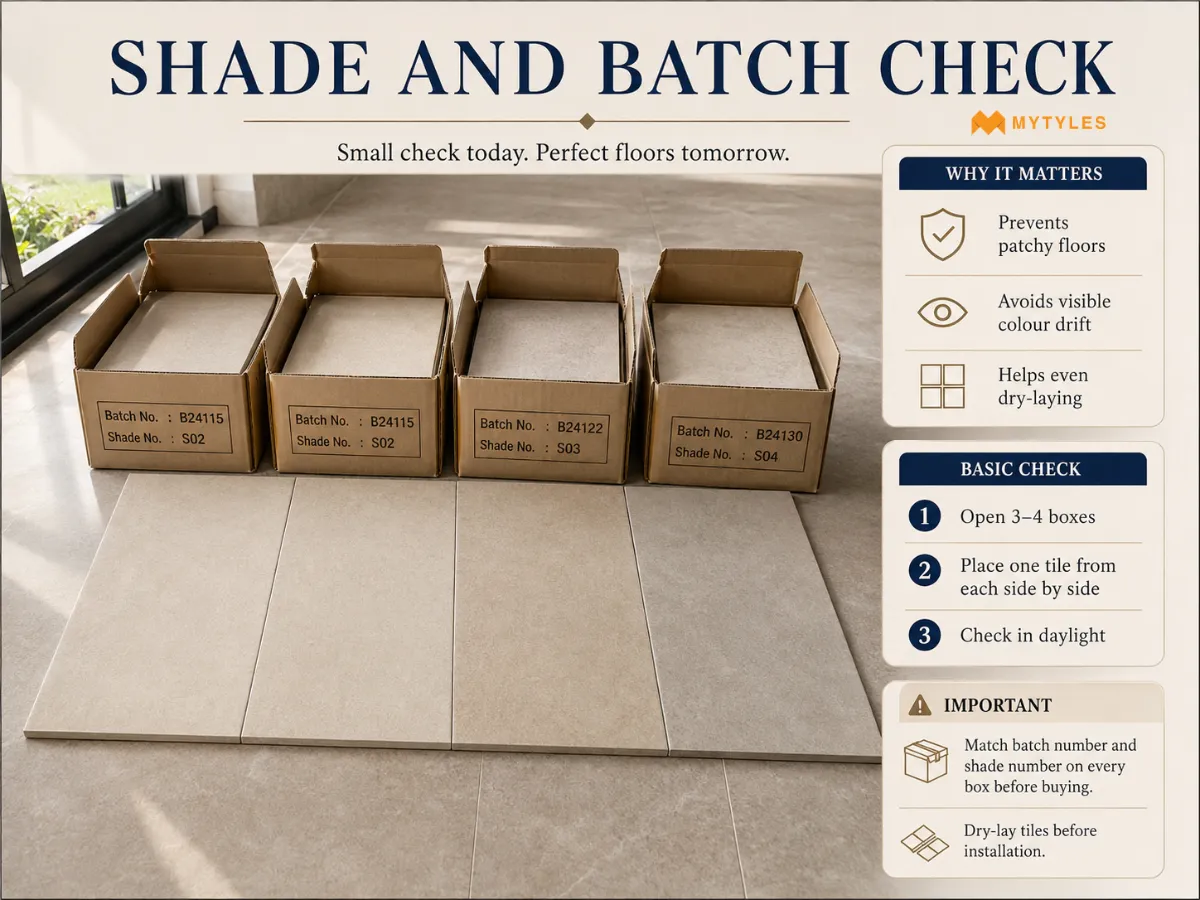
Two tiles from different production cycles can look almost identical on a sample card. On your floor, the difference becomes very obvious. The tile shade variation test compares tiles from the same batch and across batches to catch any color drift before it becomes a problem.
Always match the tile batch number and shade number across every box before buying. A tile shade mismatch on a finished floor cannot be fixed without replacing tiles. Also, check tiles under natural light. Colors shift in different conditions, and what looks uniform inside a shop may show patches outdoors. Even when shade variation is part of the design, dry laying helps distribute it evenly so no single area looks too dark or too patchy.
Basic Tile Check: Open three or four boxes at random. Pull one tile from each and place them side by side on the floor in daylight. Any color or tone difference will show clearly.
Stain Resistance Test
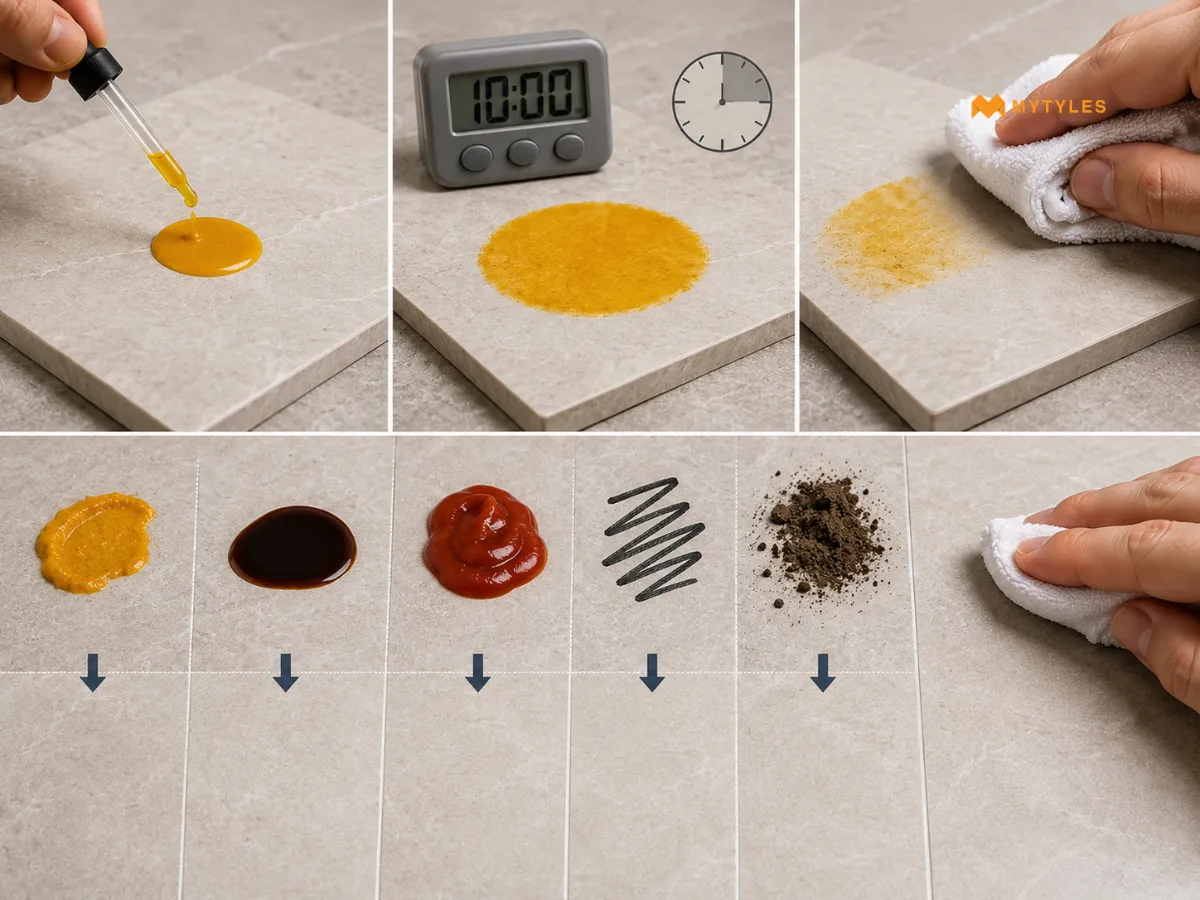
Floors and walls face oils, soap, cleaning chemicals, and dirt every single day. The tile stain resistance test exposes the tile surface to common staining agents and then checks if the surface can be wiped clean. A tile that fails this test holds stains permanently and becomes harder to maintain over time.
This matters most for kitchens, bathrooms, and commercial spaces. Also, look at the glaze quality. A thick, even glaze surface resists staining far better than a thin or uneven one. Some matt or textured tiles may hold dirt more easily than smoother polished surfaces, but stain resistance depends on glaze quality, porosity, surface texture, and manufacturer testing.
Quick home check: Drop a small amount of turmeric mixed with water on the surface of a spare tile. Wait for 10 minutes. Wipe it off with a damp cloth. If a yellow stain remains, that means low stain resistance. Do not test on already installed or purchased final tiles.
Hollow Sound Test After Installation
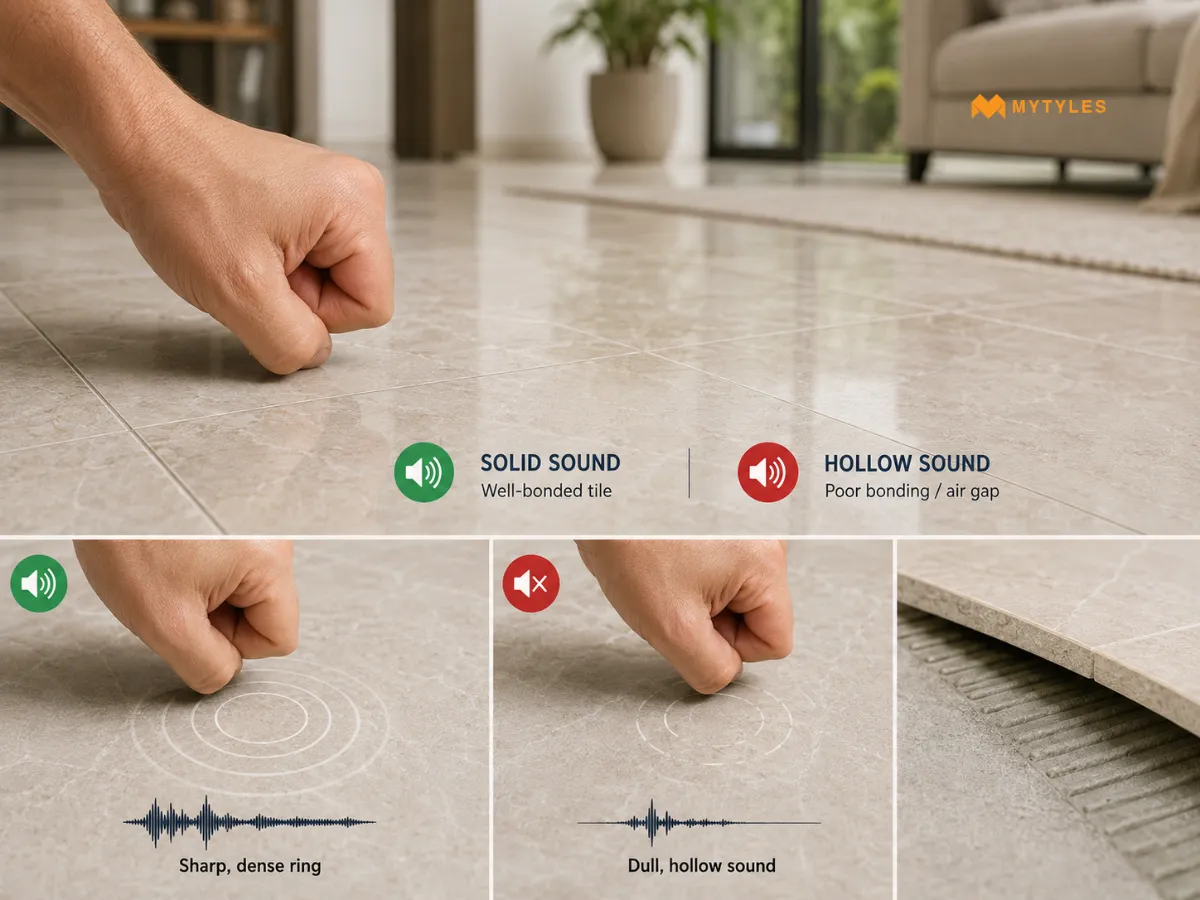
The tile hollow sound test is the simplest test on this list and one of the most revealing. Tap a tile lightly with your knuckle or a small coin. A sharp, dense ring means the tile is solid and well-bonded. A dull, hollow sound points to poor bonding, air gaps, or adhesive issues beneath the surface.
After installation, walk across your newly laid floor and listen carefully. Any hollow sound in tiles means the tile has not bonded properly to the base below. Sometimes, poor bonding could lead to higher chances of cracking or debonding over time.
If only a very small area sounds different, ask the installer to inspect it. If several tiles sound hollow, feel loose, or show cracks, they may need repair or relaying.
Tile Test Checklist
It is always better to do a tile quality test than to regret it later. A few minutes of checking before, during, and after installation can save you from cracked floors, mismatched shades, and costly replacements down the line.
Before Buying
- Check the water absorption rating on the spec sheet
- Confirm Mohs hardness rating
- Check the slip-resistance rating for wet areas
- Verify the tile shade number matches your order
After Delivery
- Open every box of tiles
- Check tiles under natural light for shade mismatch
- Compare the tile batch number across all boxes
- Inspect for chips and cracks visually
Before Laying
- Dry-lay tiles before installation in natural light
- Check the edge quality on every tile piece
- Look for size variation across your tile batch
- Run a flatness check on every tile before fixing
After Installation
- Tap each tile for a hollow sound
- Check for uneven tile flooring or lippage
- Look for grout gaps and alignment
- Set aside extra tiles for future repairs, replacements, or accidental damage
Your Floor Deserves A Better Choice
Long-lasting floors and walls start with these simple tile tests. Most tile problems are not accidents. They are the result of skipped checks and rushed buying decisions. If you are unsure which tile meets the right PEI rating, slip resistance, or absorption standard for your space, talk to our tile professionals. They can match the right tile to your room, usage, and budget. Browse the MyTyles website to get started.
Expert Reviewed by Biren Agrawalla
Biren Agrawalla, the Founder of MyTyles with over 10 years of experience across tile, retail, and home decor. Driven by a passion for tiles and a deep understanding of customer behaviour, he has spent his career transforming how people discover and buy tiles online. Biren combines practical retail insight with modern digital solutions to make tile shopping smarter, more intuitive, and design focused. At MyTyles, he champions a customer first approach, ensuring every experience from browsing to buying is reliable, seamless, and inspiring.

What Is A Tile Test And Why Is It Important?

A tile test refers to a series of checks used to evaluate a tile's quality, durability, and suitability before purchase or installation. These checks may include flatness, shade variation, water absorption, surface finish, and edge consistency. Conducting basic tile tests helps buyers avoid installation issues
How Can You Test Tiles Before Buying Them?
Before buying tiles, inspect their surface, dimensions, finish, and overall consistency. Compare multiple pieces from different boxes to check for variation in color or pattern. You can also review technical specifications such as water absorption, slip resistance, and durability ratings. These checks provide a better understanding of the tile's quality and long-term performance.
How Do You Check Tile Flatness Before Installation?
Tile flatness can be checked by placing the tile on a level surface and observing whether all corners sit evenly. A straightedge or spirit level can also be placed across the tile to identify bends or raised sections. Checking flatness before installation helps reduce lippage and supports a smoother, more uniform finished floor.
How Can You Check Tile Shade Variation?
To check tile shade variation, open multiple boxes and arrange several tiles side by side under good lighting. This helps identify differences in color, pattern, and tone. Reviewing tiles together before installation allows better distribution of variation across the surface and reduces the chance of noticeable patches after the project is completed.
How Do You Check Tile Water Absorption?
A simple way to observe water absorption is by placing a few drops of water on the back of the tile and monitoring how quickly the moisture disappears. Tiles with lower absorption generally resist moisture more effectively. Reviewing the manufacturer's specifications provides the most accurate information about a tile's water absorption performance.
What Should You Check Before Buying Tiles?
Before purchasing tiles, review the material, size, finish, slip resistance, water absorption, shade variation, durability ratings, and intended application. It is also important to consider room usage, maintenance requirements, and overall design compatibility. Evaluating these factors helps ensure the selected tiles meet both functional needs and aesthetic preferences.

ABOUT THE AUTHOR
Nandana Priya
With a strong interest in design, creativity, and emerging tile trends, I enjoy turning ideas from the world of tiles and interiors into engaging, meaningful reads. My writing focuses on creating well-researched content that helps readers understand design choices with more clarity and confidence. I bring together research, design awareness, and digital marketing insights to craft content that is relevant, easy to follow, and thoughtfully written for todays homeowners and design-conscious readers.
Latest Blogs By MyTyles